Search This Blog

Friday, September 10, 2010

One Skein Fun: HEARTH SOCKS

I mentioned in June that I met a fun new friend at Black Sheep Gathering in Eugene.  Cathy Redwine is the owner of Beacon Bend Alpacas in Eugene.  They raise their own fiber sources, and well, Cathy's just a great new fiber friend. 

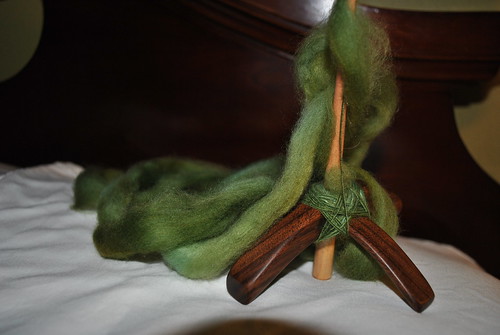
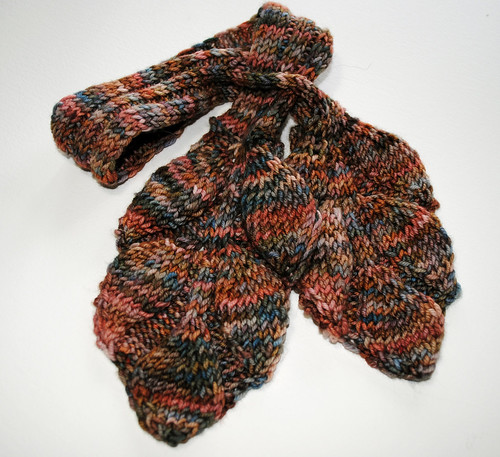
She and I teamed up recently to test drive one of her new products, "Bunny Cuff" hand spun alpaca/angora yarn.  I gave her hand-spun sample a test run and came up with Hearth Socks: You know, those warm snuggly socks you can't wait to put on at the end of a cold, rainy day when you just want to prop your feet up in front a roaring fire and relax.  "Heather Foxy" graciously offered to participate in the project by donating fiber.


I knit up the cuff in "Bunny Cuff", and created the body of the sock with my hand painted Kathee's DK superwash, super soft merino, done here in Winterscape.  We thought the blend of natural colors and the natural cuff fiber was a winning combination! 


The Bunny Cuff yardage requirement was minimal, and the DK yarn requirement was less than 1 skein (Kathee's DK comes in 100G skeins).  For a larger foot or taller sock, 1 skein would still be the maximum yardage requirement. 

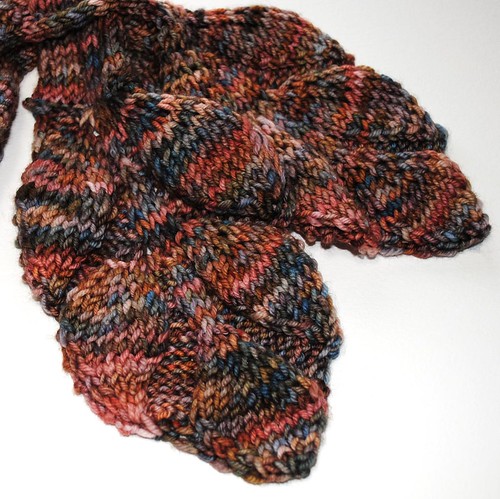
I decided as I was knitting up this sample that a more natural, rustic design would be best.  I created the center design panel in a basic P5, 4-stitch cable, P5 pattern with a 6 row repeat, and a simple cuff down construction, on US 3 double points. 


This was a fun 1 day project - and I'll definitely be making more of these as the Pacific Northwest heads into the rainy winter season.

Beacon Bend Alpacas will be at OFFF in Canby, Oregon this month, and you can see the Hearth Socks as well as purchase Bunny Cuff  or fiber ready to spin, and Kathee's DK to create your own!  Be sure to stop by! 


HEARTH SOCKS
©Kathee Nelson

SUPPLIES:

Size 3 Double Point Needles (can also be done on 2 circulars)
Appx. 60 gms Kathee’s DK (superwash merino) from Kathee Nelson Art Yarn
Appx. 60 yds Bunny Cuff hand-spun DK from Beacon Bend Alpacas
Darning Needle
Cable Needle**

These instructions fit a lady’s size 6-7 foot. You’ll need to make adjustments if you need a wider calf opening or larger foot; there are many free patterns on the web available for that purpose.

CABLE PANEL (6 row repeat):

Row 1: Purl 5, **slip 2 stitches to cable needle and hold in front of work, K2, K2 stitches from cable needle, Purl 5.

Row 2-6: Purl 5, K4, Purl 5.

**I do not use a cable needle unless I absolutely have to. With a 4 stitch cable in DK, you can simple slip the first 2 stitches off of your left hand needle and carefully put them to the front of your work, K2, pick up the 2 dropped stitches back onto your left hand needle, and knit them. (The tighter you knit, the more difficult this is.)

The Cable Panel is worked down the entire front of the sock until the toe decreases begin, with straight stockinette around the rest of the sock. “Work in Pattern” means work the cable panel when you come to it, and knit the other stitches in stockinette.

CUFF:

In “Bunny Cuff,” cast on 48 sts with a knitted cast; divide stitches between 3 needles, join round, taking care not to twist the stitches. Work 1 to 1-1/2 inches of K1, P1 rib.

LEG:

Switch to Kathee’s DK/main color. Knit 1 row.

Establish cable pattern:

Work cable pattern rows followed by straight stockinette stitch until the leg of the sock, including the cuff, measures 6 inches (or desired height to ankle).

HEEL FLAP:

Setup: Place Marker (to divide top of sock from bottom half of sock). K5, work 14 stitches of panel pattern, K5. Place Marker. (Keep the markers in place until you complete the entire heel and are ready to knit straight again for the foot portion of the sock.)

Divide the 24 stitches just knit (top of sock/instep; (5 knitted stitches, 14 panel stitches, plus 5 knitted stitches = 24 total instep stitches) onto 2 needles.

Combine the remaining 24 stitches (bottom of sock) onto 1 needle (these stitches will now be worked back and forth to create the heel flap (“short rows”)).

Start the heel flap rows, working back and forth:

*S1 purlwise, K1; repeat from * to end of heel flap row. TURN.

Purl all WS stitches on Heel flap. TURN.

Repeat these 2 rows back and forth until you’ve completed 24 rows. Because you are slipping stitches, it will look like you’ve worked 12 rows when you counting the stitch rows on the right side. End at the beginning of a RS row.

TURN HEEL:

This is the only tricky part to knitting socks. It’s actually quite easy, but doesn’t make sense until you watch the heel somehow miraculously turn and form a cup!

ROW 1: Knit 14 stitches (to middle of heel flap plus 2 stitches), SSK, K1. TURN.

ROW 2: S1 purlwise, P6, P2tog, P1. TURN.

*Tip: At this point, there should be 7 unworked stitches on either end of the center worked area on the heel flap.

ROW 3: S1 purlwise, K to 1 stitch before the gap created by the P2tog in the previous row, SSK, K1. TURN.

ROW 4: Slip 1 purlwise, P to 1 stitch before the gap created by the SSK in the previous row, P2 tog, P1, TURN.

Repeat rows 3 and 4 until all the stitches have been worked to the end of each side of the heel flap. Look! You turned a heel!

GUSSET:

Note: You will now be working in the round again. The gusset rows connect the heel flap to the body of the sock, and create the triangle of stitches that is part of the side of your sock heel. At first, it will seem that you will have too many stitches, but once the gusset rows are done, you’ll be back to the 48 stitches you began your sock with. It’s a bit awkward to work these gusset rows and get the stitches onto the right needles. Experienced sock knitters do not all do these rows the same way. Just keep going, it will all come out right in the end. The first row is awkward, because you are moving stitches around onto needles, but it helps set up the gusset section and gets the stitches where you need them to be to work the rest of the gusset rows comfortably.

Gusset set up row:

NEEDLE 1: Place a marker in the center of the heel flap stitches. (If you ended up with an odd number of stitches after the turn rows, K2tog in the center of the heel flap when you knit those stitches.) Knit across heel flap. Continuing with Needle 1, pick up 12 stitches along the side of the heel flap by knitting into the back of the slip stitches (there should be 12 stitches to work into evenly spaced along the side of the flap). Pick-up two additional stitches in the space between the instep/top of sock and the heel flap with the left-hand needle; and then knit these 2 stitches together. (This helps to prevent a hole in your finished sock). At this point in time, using an extra needle, move all of the picked up stitches and half of the heel flap stitches to a separate needle. That becomes NEEDLE 1.

NEEDLE 2: Work in pattern across all of the instep stitches. (24 instep stitches are now all back on 1 needle.)

NEEDLE #3: Pick up 2 stitches in the space between the instep and 2nd side of the heel flap with the left hand needle, then knit those 2 stitches together. Pick up 12 stitches along the 2nd side of the heel flap as you did on the other side, and knit to the center of the heel flap. (You can now remove the marker at the center of the heel.)

Here’s what you should have on your needles now: Your working yarn should be in the middle of the heel stitches. Needle 1 should start in the center of the heel, contain all of the picked up gusset stitches on the left side of the heel. Needle 2 should contain all of the instep stitches. Needle 3 should contain all of the picked up stitches on the right side of the heel flap plus the other half of the heel stitches.

*Tip: As long as you keep all of the instep stitches on 1 needle, you no longer need the markers; if you want to adjust some of the instep stitches onto the other 2 needles for comfort as you work this section, be sure to place markers again so that you know where your instep stitches begin and end.

Begin Gusset Decreases:

Gusset Row 1:

Needle 1: Knit to last 3 sts, K2 tog, K1.
Needle 2: Knit across in pattern.
Needle 3: K1, SSK, knit to the end of the needle.

Gusset Row 2: Knit around.

Repeat rows 1 and 2 until your total stitch count is back to 48.

FOOT:

Knit in pattern until the length of the foot from the heel reaches the base of your big toe when stretched a bit (remember, when you put your socks on, they stretch onto your feet a bit; you don’t want to end up with a baggy sock.)

TOE:

You will knit the rest of the sock in stockinette stitch. It’s nice to end your last pattern row with the cable twist row if possible.

Row 1: (Decrease round):

Needle 1: Knit to the last 3 stitches, K2 tog, K1.
Needle 2: K1, K2tog, knit to within last 3 stitches, SSK.
3rd needle: K1, SSK, knit to the end of the needle.

Row 2: Knit.

Notes: Repeat Rows 1 and 2 until there are 20 stitches left. If you have extra long toes, you may need to put a few extra Knit rows between the decrease rows.

Cut yarn leaving about 12 inches of yarn, and graft/sew toe stitches together using a kitchener stitch. (See the intranet for instructions and videos.)

Sunday, August 1, 2010

"So Easy a Kid Can Do It!"

My five year old granddaughter was visiting a couple of weeks ago.  She informed me that she needed a 'first day of school sweater,' and wanted to dye her own yarn (because, apparently, the WALL of yarn in my art room didn't have what she was looking for). 

We took some Little Lambie Plus yarn base and got to work.  Here's what her yarn looked like after she was done pouring:


I was a tad worried that I'd have to knit her up a hippie sweater with granny squared and fringe based on how the yarn looked in the dye bath, but her 'special yarn' has surprised me in the past, so I decided to withhold judgment until it was steamed and dried.

Amber was very impressed with her handy work and checked it every few minutes to see if it was dry yet.


Finally, the yarn was dry, and we skeined it up:


Amber wanted to help me "yarn it" so we loaded it onto the skeinwinder, and (drumroll):


Kindergarten is about 30 days away -- I guess I'd better get knitting!  I'll update this post once it's done and wrapped around my BFF.  Won't she be the sharpest show and tell kid in the school!?

Monday, June 28, 2010

Never Say Never

I love to knit, and said I'd never dye my own yarn or write patterns (bunch of hippies!).  Now that I've written a few patterns and regularly dye and sell hand-painted yarn, I hold firm that I will NEVER, NEVER be a spinner (little old ladies!). 

And then I was a vendor at Black Sheep Gathering in Eugene Oregon, and sat across the aisle from a spinning wheel and really nice gal who is definitely not old- Patti from Sweet Grass Wool .  Really, there was just nowhere else to look, so I watched her spin, and bugged her to death with all of my questions (for informational purposes only of course).  By the end of the weekend I had convinced myself that 'as a souvenier' I'd buy a drop spindle - "just for fun."

Enter the Jenkins Turkish Drop Spindle - and the extremely friendly proprietors from Jenkins Woodworking.  In ten minutes I'd had a lesson and purchased a spindle.


The folks at Jenkins Woodworking also had an inexpensive booklet and DVD that tell everything you need to know to get started (not that I was going to spin or anything) - and it really did.  The first 30 minutes was like trying to run backward, rub my head and pat my tummy at the same time while saying the alphabet in German (I don't speak German).  But by the end of about 60 minutes I was spinning away, and by the end of the first 2 ounces I had a good handle on spinning evenly (sort of).  Within 48 hours of returning home I had spun 4 ounces, plied it, set the ply, and skeined up my first homespun yarn (a bit more purple IRL) from some BFL top I obtained from my booth-mate, Sharon Spence.  The colorway is Bollywood, and it's really - bright.  I'm hoping there's enough to make some fun mittens for this winter.


In honor of my new acquisition and because Patti is just so darned nice, I also bought from Sweet Grass Wool some really yummy 80/20 merino/cashmere handdyed fiber in a peridot colorway. 


I really want to spin this into a 2-ply lace weight, and was concerned that I couldn't spin that fine a thread (on purpose), but it's going pretty well!


I also met Cathy from Beacon Bend Alpacas, who was right across the aisle from me.  She had the most interesting fiber - and I finally got up enough nerve to go ask her what the heck that stuff was.  It looked like this:  It's alpaca with silk (the white blobs) roughly combed through it that spins up into the softest, most interesting yarn.  Cathy and her husband raise alpaca, and angora bunnies.  Loved those guys! 

All in all, it was a very successful weekend on several fronts.  I sold lots of yarn, met some hilarious, wonderful shoppers, made some fiber friends (not cyber, - f-i-b-e-r), learned how to spin, and found another way to multi task when reading and watching TV at the same time are not enough. 

Thanks Patti (who is not a little old lady or a hippie).

Wednesday, March 3, 2010

Ritz Lace

I'm such a sucker for really high end yarn - what can I say?  My mother raised me well.

I've been on a search for the 'perfect lace yarn' for some time now, and my supplier has answered the call and really outdone herself!  Introducing: Ritz Lace!  This yummy, soft, shiny fiber is 80% alpaca, 20% silk, and 10% cashmere - the drape of beautiful and the yarn reflects light.  As with all fiber with silk content, it takes the dye beautifully - and even the most subtle colors are nice and saturated.  The skeins are nice and generous: 100 grams and 1300 yards!

Here's a sneak peek at a few colors that just loaded to the shop

Sterling - it's as shiny as the real thing - a very cool gray that halos blues and pinks.  This was an experimental dye lot - I'm not sure I can even recreate it!


Tulip - rose, green, blue, and gold - all in Spring tones.


Mink - taupey browns with a bit of gold and  bronze highlighted passages.

Monday, February 22, 2010

Regina Mittens - Bobbles and Bobbles of Fun!

I started my 2nd 'ravolympic' project a few days ago.  I wanted to knit up some of my Lamb Silk in a purpley-orchid color.  I was looking for mittens or gloves, and came across Regina Mittens.  The original pattern is for fingerless mitts, but I will be finishing off the thumb and working a full mitten top. 

This yarn knits so nicely - 50% extra soft merino and 50% super shiny silk - warm and soft all at the same time.  The interesting thing about this pattern is the bobbles.  I've done other lace projects that have 'knupps' - which are bobble-ish, and look pretty nifty when done, but they are difficult to work, at least in lace weight.  This bobble, on the other hand, is very round and easy to do.  You knit 5 stitches into 1, turn, purl all 5, turn, slip the first 4 over the last stitch, and then knit off the last stitch and continue on with the row/pattern.  Brilliant.  The finished bobble is very round and compact.  I'm not sure I'd like them in a bigger yarn, but this size is great, and I'd do them in place of a traditional knupp in lacework for sure.

I also changed the cuff from a traditional ribbed cuff to my favorite picot edging.  The yarn is so luxurious that I thought it needed a daintier edge.  I hope to finish off the first mitten in the next 2 days so I can complete both by closing ceremonies of the olympics.  Fingers crossed!

Sunday, February 21, 2010

An Opportunity to Change Lives

Each of us living in the states have so much to be thankful for - roofs over our heads, food on the table, access to healthcare, and a free education.  Even in this recession when things are very hard for so many, we really are very blessed in comparison with much of the world.  When I travelled throughout Peru in 2008 with my son, Tyler, this was brought home to me in so many ways.  I met wonderful people who were living in circumstances that were hard to imagine - people who worked very hard for very little, and have no real opportunity to improve their situation. 


Tyler is in college now, and he and his new wife (America) are going to El Salvador May through August of this year for humanitarian work. Tyler has been appointed one of the Country Directors, and will be coordinating the volunteers in country for HELP International. HELP In'tl provides assistance in orphanages, garden plots, health and hygiene programs, and medical assistance to impoverished nations. America is graduating in April as a linguistics major, so she will be coordinating and teaching english classes and assisting Tyler with the admin tasks as a volunteer. Tyler is working on his international healthcare degree, and working with this non-profit is another step towards their planned future in humanitarian efforts abroad and at home.


As college students, they are poor (aren't they all??), and need help raising funds for America's travel and a portion of her living expenses (Tyler's are covered), as well as service project-related funds. They need to raise about $3,500, and while a private grant foundation may be covering a portion of this amount, they still need about $1,000 for the rest of their travel/living expenses. Any money over and above that amount that is raised before they get to El Salvador goes directly to the cost of the humanitarian projects on the ground.

We are so proud of these kids, and would like to help them raise funds for this very worthy cause.  If you would like to donate, this can be done through the HELP International website.  Donations in any amount can be made via the link above on the Donate tab - and should be earmark for 'Tyler and America Nelson' in the memo field. Any donations raised above the actual travel expenses needed go directly to the HELP project funds in El Salvador.

Monday, February 15, 2010

One Skein Wonders

For those who don't knit, you might not know about Ravelry. Ravelry is an online forum for knitters, crocheters, spinners, and yarn dyers.  I find most of the patterns that I use on Ravelry, and am always inspired by the projects and yarn art posted there.  Ravelry is supporting the winter olympic spirit by holding the ravolympics.  I'm not much of a 'joiner' - but decided to join a team at the last minute to challenge myself to complete several knitting projects in the two weeks the olympics run. 

My first project was a 24 hour sprint:  Leafy Cabled Scarf by Grace McEwen.  I found Grace's designs on Etsy and Ravelry, and think they are really beautiful.  I'm always excited to find great knits that can be done quickly with a single skein.  Art yarn can be expensive, and while most people can splurge on a skein occasionally - but it's not always easy to find a single skein pattern that is exciting.  I recently dyed some DK superwash in a winter multi-colorway that I wanted to try out.  I used Kathee's DK in Winterscape, and ended up with this:


I thought at first that the colorway might be a bit too busy for the pattern, but as you can see, the design is quite distinct and the leafy pattern shows well.  I modified the pattern just a bit: I eliminated the cables on the neckband so that it would lay open wider, and put a slit on one side so that one leaf cluster would feed through the slot and the scarf would stay closed on its own. 


I am so happy with the way this DK superwash handles and will be carrying it on a regular basis. 

I'm not 100% sure what I'm doing for my second project - it's a toss up between nordic stranded mittens or lacy cabled mittens.  Spring is not quite here in the Pacific Northwest, so there's plenty of time to enjoy mittens and scarves.  Take a look at the rest of KnitChickGrace designs - there are several fantastic one skein wonders!

Friday, January 29, 2010

This is Who I Am - You'll Just Have to Deal With It!

OK, so I'll share a bit about myself, and then only bore you with info on my amazing family if I just can't keep it in.

Thursday, January 28, 2010

2-At-A-Time - or just 1

I first discovered knitting when I was about 4 years old. My brother and I would play under the dining room table while our mother knit. She would knit little 1x3 inch swatches (probably her gauge swatches) and then throw them under the table for us to play with. I was fascinated that something could be created from a skein of yarn.


I learned to knit continental style when I was about 10 in a community knitting class, but didn't really get into it until my kids were small. I thought when I had a neck injury several years ago and then developed RA my handwork days were over, but have found it very therapeutic, and so I've been happily knitting away again!


Currently, my favorite fiber combo is Cash-Ewe, merino, cashmere and nylon (80/10/10). I dyed up some stock last week, and ended up with a soft color blend of ivory, and fleshy pink colors. It reminded me of my sister's cat, Fletch, a pale tabby, hence the colorway Tabby Cat.


Here's where I am so far with Belle Epoque by Melissa Oakes.


Oh, and by the way: LOVE doing the picot edging. It may end up on every pair of socks from now on! You knit some rows, do the picot row, knit some more rows, then fold the edge to the inside and knit a round, catching the cast on edge with each stitch. Voila! Picots!


The mock cables are very cool - and I think they really enhance the lace panel in a delicate way. I omitted the panel up the back. I know - it's supposed to be knit 2 at a time with the magic loop, but I just can't do it! I've tried 3 times now. I didn't want to pull out a 2nd ball of yarn, so I decided to just do 1 at at time on 2 cables. I use a blue one and a gold one so that I don't get confused about which needle to to pick up next. I'm pretty happy with the variegated colorway and how softly it's knitting up. I liked it so much that I did the colorway in lace and worsted weights too. It looks like I'll be able to complete both socks easily with the 1 skein. I also really like Melissa's heel mechanics - I have small, narrow heels, and this narrower heel fits much better.

EDITED: HERE'S  THE FINISHED PAIR - SO SOFT AND COMFY!


I'm also working on a Travelling Woman shawl, which I think I'm going to modify. This is one of those 'everthing but the kitchen sink' colorways - a happy accident. I had 3 skeins of SW fingering that turned about a blah, mousy brown. I pulled it out at the end of a dye session and literally poured all of the leftover dyes onto it - and ended up with autumn colors that I love. They are much more intense than my photography skilled...